“`html
How to Record Screen on Windows 10: Top 5 Effective Methods
Recording your screen has become an essential part of our digital lives, whether you’re creating tutorials, capturing gameplay footage, or recording online classes. In this article, we will explore five effective methods on how to record screen on Windows 10. We’ll also cover tips for achieving the best results, ensuring clarity and quality in your recordings.
Utilizing the Built-in Windows 10 Screen Recorder
Windows 10 comes with a fantastic built-in tool for screen recording known as the Game Bar. This tool allows users to capture gameplay and general screen recordings without the need for additional software. To **enable the Game Bar**, simply go to your system settings and ensure that gaming features are turned on. Once activated, you can start recording by pressing Windows + G.
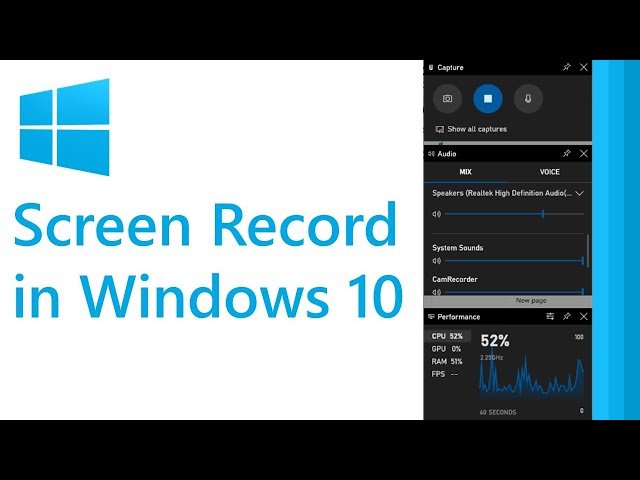
Easy Steps for Using Game Bar
To capture your screen using the Game Bar, follow these simple steps: 1. Launch the program or screen you want to record. 2. Press Windows + G to open the Game Bar interface. 3. Click on the **Record** button or press Windows + Alt + R to start recording. 4. To stop the recording, click the stop button or press Windows + Alt + R again. Your recordings are saved automatically in the **Videos > Captures** folder.
Recording with Audio
If you want to record screen with audio, make sure to enable sound settings in the Game Bar. Before starting your recording, click on the **Settings** gear icon on the Game Bar and check the **Record audio when I record a game** option. This will allow you to add narration to your screen recording seamlessly, enhancing the viewer’s experience significantly.
In conclusion, the Game Bar is an accessible and effective tool for most users who want to capture their screen effortlessly. Let’s move on to our second method.
Using Third-Party Screen Recording Software
For those desiring more advanced features, using dedicated screen recording applications can significantly enhance your recording experience. Many acclaimed options such as OBS Studio, Camtasia, and Bandicam not only allow you to record your screen but also provide editing options and various export formats.
Choosing the Best Screen Recording Software
When selecting the best screen recording software, consider your specific needs. For example, OBS Studio is highly favored for its open-source flexibility and powerful features for live streaming and recording high-resolution video. On the other hand, if you’re looking for easy-to-use software with robust editing capabilities, Camtasia is an excellent choice. Always check for free trials or versions to find what works best for your screen recording tutorial needs.
Editing Screen Recordings After Capture
After capturing your screen, you may want to refine your recordings using a video editor. Most screen recording software includes basic editing tools where you can cut unnecessary segments, add narration, and include annotations in recordings. For Windows users, Windows 10 video editor provides a free option to tweak your videos before sharing or exporting them.
Using third-party software for screen recording offers extensive options for customization and editing, making it suitable for professional use as well. Moving on, let’s explore using PowerPoint for screen capture.
Capturing Screens with PowerPoint
Did you know that PowerPoint also has a built-in screen recording feature? This feature is particularly useful for creating rich video presentations. Recording your screen in PowerPoint is simple, and it allows for seamless integration of the recorded clips into your slides.
Recording Your Screen in PowerPoint
To record your screen using PowerPoint, follow these steps: open PowerPoint and navigate to the slide where you want to include the screen capture. Next, click on the **Insert** tab and choose **Screen Recording**. Select the area you want to record, then use the **Record** button. Once finished, you can directly insert the recording onto your slide. This method is perfect for creating presentations that require demonstration videos such as **recording educational videos** or tutorials.
Saving and Exporting Screen Recordings from PowerPoint
You can save the recorded clips even if you don’t need them in a presentation. Select the recorded section in your slide, right-click, and choose **Save Media as**. This action allows you to export your recordings as video files that you can share separately or for various uses like **recording meetings on Windows 10**.
PowerPoint is a versatile tool for not just presentations but also screen recording, making it a convenient option for users who frequently work in Microsoft’s ecosystem. Now let’s discuss yet another method to record your screen.
Recording Your Screen with Specialized Capture Tools
For users looking for even more elaborate features, several specialized screen capture tools exist. Software like Snagit and ShareX enable comprehensive features for quick capture and annotation, which are valuable for creating instructional material and professional guides.
Using Snagit for Advanced Screen Capture
Snagit is one of the most user-friendly options available for professionals who require quick and efficient screen recording. With options to capture screenshots, you can also record high-quality videos. Simply select the capture mode, choose your screen area, and hit record. Its advanced features allow for effective editing, making it an excellent software for making effective training videos.
Accessible Screen Recording and Sharing Options
ShareX is another fantastic option that stands out for its open-source nature and effective sharing capabilities. Record your screen with ease, add annotations, and share directly to platforms like YouTube or via link. These features streamline the **screen recording for training** efforts especially when rapid dissemination of information is essential.
Specialized tools provide powerful functionalities tailored to specific needs, particularly for educators and content creators. Finally, let’s conclude with some helpful tips for successful screen recording.
Best Practices for Effective Screen Recording
To make your recordings engaging and professional, consider the following helpful screen recording tips: always prepare an outline of what you plan to show, ensuring your screen is clutter-free, and check your audio settings before starting the recording. Additionally, using a **high-resolution screen recording** option enhances video quality significantly, providing clearer visuals for audiences.
Understanding Screen Recording Settings
Take time to familiarize yourself with the recording settings in your chosen software. Adjusting video quality settings, choosing optimal screen recording file formats, and enabling the option to **record audio alongside video** can drastically improve the outcome of your recordings. Always test your setup before actual recordings to identify any issues beforehand.
Editing and Saving Your Recordings
Once you’ve completed a recording, taking a few additional minutes to edit the video can elevate its quality. Use your software’s editing features to cut out long pauses or errors. Finally, ensure you know how to save your screen recordings in the desired format to make sharing and accessing later easier.
In summary, whether you’re using built-in features like the Game Bar, powerful third-party software, or integrating screen recording with tools like PowerPoint, there are numerous effective methods for recording your screen on Windows 10. Make the most of these tips and tools to capture your screen effectively.
Key Takeaways
- Use Windows 10’s built-in Game Bar for quick and easy screen recording.
- Explore third-party applications like OBS Studio and Snagit for enhanced features and editing options.
- Leverage PowerPoint to record and integrate your clips into presentations seamlessly.
- Follow best practices to ensure professional-quality recordings with good audio and visual clarity.
- Understand the settings of your chosen tool to optimize the overall recording experience.
FAQ
1. Can I record my screen with audio using Windows 10’s built-in features?
Yes, you can indeed record screen with audio using the Game Bar. Just enable audio settings in the Game Bar settings menu before starting your recording.
2. What is the best screen recording software for beginners?
For beginners, software like OBS Studio or ShareX is highly recommended due to their user-friendly interfaces and robust features for basic screen recording tasks.
3. How can I save my recordings in a specific format?
Most screen recording tools provide options to select your preferred file format during the export process. Review the settings or export >>> options within your software to customize this.
4. Are there any free screen recorders available?
Yes, several free options exist; OBS Studio and ShareX are great selections. Additionally, Windows 10 users can utilize the built-in Game Bar for free without any downloads.
5. How can I ensure high-video quality in my recordings?
Adjust your video quality settings to high-resolution and perform test recordings to find the best setup in your selected screen recording application.
“`