How to Properly Use the Snipping Tool: Explore Smart Techniques in 2025
Overview of the Snipping Tool
The snipping tool is an essential piece of software for anyone who regularly takes screenshots or needs to capture specific screen areas for documentation and communication. Launched as an accessibility feature within the Windows operating system, it has evolved to become a user-friendly tool widely used by professionals, educators, and casual users alike. In this guide, we’ll explore the various snipping tool features, settings, and tips to help you maximize its potential in your daily tasks. By the end, you’ll have a thorough understanding of how to enhance your productivity with the snipping tool.
Understanding Snipping Tool Functions
The snipping tool functions are straightforward, enabling users to capture different areas of their screens effortlessly. Users can choose to capture a free-form snip, rectangle, window, or full-screen mode. A quick understanding of these options can greatly enhance your efficiency. For instance, the free-form option allows you to draw any shape on your screen, while the rectangle snip captures screenshots in a rectangular area. On the other hand, using the window snip feature makes it easy to capture a particular application window, and the full-screen feature captures everything displayed on your screen. Each function can be accessed with a simple click, making it ideal for creating visual documentation swiftly.
Snipping Tool Interface and Navigation
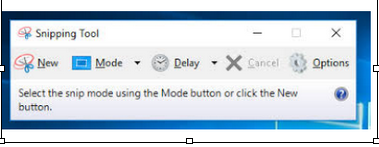
The snipping tool interface is designed to be intuitive, ensuring users can navigate seamlessly while completing their snipping tasks. When you launch the tool, you’ll encounter a straightforward interface with options to create a new snip, access previous captures, and adjust settings. Besides capturing, users can also use annotation features to highlight key areas of the screenshot before saving or sharing. This intuitive design is pivotal for novice users or anyone unfamiliar with screenshot software. Familiarizing yourself with the interface is key to making your screenshotting seamless.
Recognizing Snipping Tool Limitations
<pWhile the snipping tool is versatile, it’s imperative to be aware of its limitations. One of the primary limitations is the lack of extensive editing options. For more advanced image editing tasks, you might need dedicated software. Furthermore, while the snipping tool is bundled with Windows, users on Mac or other operating systems may need to explore alternatives. As technology continues to evolve, checking for updates ensures you’re using the best features offered by the latest version available.
Effective Snipping Tool Techniques
Now that we’ve covered the basics, let’s delve into the smart techniques you can employ while using the snipping tool. Mastering these snipping tool tips will enhance your user experience and efficiency significantly.
Utilizing Snipping Tool Shortcuts
One of the most effective ways to speed up your workflow with the snipping tool is by using keyboard shortcuts. For instance, pressing “Windows + Shift + S” allows you to quickly initiate the snipping tool and select the screen area you wish to capture without needing to open the application manually. This technique can dramatically reduce the time it takes to take significant screenshots. Moreover, learning these shortcuts not only helps you but can also be shared with collaborators for improved teamwork.
Saving and Sharing Snips
Taking a screenshot is just the beginning; knowing how to effectively save and share your snipping tool captures is equally important. After capturing your desired area, you can easily save it in various formats such as PNG, JPEG, or GIF. To share a snip, simply use the clipboard feature and paste it directly into emails or documents. This ensures that sharing critical information becomes hassle-free. Additionally, utilizing cloud storage solutions can further simplify accessing and sharing your snips across multiple devices.
Editing Your Snips
The snipping tool editing options allow you to enhance your screenshots with annotations, highlighting, or drawing features. For instance, if you need to point out an important feature in a screenshot, the pen tool can be employed to circle or underline it. Saving your annotated screenshots allows better comprehension when sharing with colleagues or peers. As workflows evolve, sharing annotated screenshots contributes to better communication, ensuring that visual documents support ongoing projects effectively.
Advanced Functions of the Snipping Tool
Moving beyond the basics, knowing the advanced functions of the snipping tool can greatly benefit those engaged in detailed projects or learning environments. Here, we will look at functions that provide users with more versatility in how screenshots are utilized.
Creating Snips for Educational Purposes
The snipping tool for education is a powerful aide in creating engaging visual learning materials. Educators often use it to capture essential points from presentations, textbook pages, or instructional videos. The versatility of the snipping tool allows teachers to combine snips into lesson plans or guides, supporting varied learning outcomes. Furthermore, the ease of capturing content enhances virtual communication between teachers and students, engaged in remote learning. This promotes a modern, efficient learning experience.
Collaborative Use of the Snipping Tool
For teams working collaboratively, adopting the snipping tool for teamwork significantly improves productivity. By capturing screen portions quickly and sharing them in real-time during discussions, team members can highlight problems or ideas visually. Incorporating visuals from screens enables clearer communication across digital platforms. Additionally, using group chat apps or collaborative tools aligned with snipping capabilities helps integrate discussions effortlessly.
Choosing the Best Snipping Tool Alternatives
While the native snipping tool is excellent for basic needs, those looking for more advanced features may explore other options. The snipping tool alternatives available provide varying functionalities that can cater to diverse professional demands. Tools like Snagit and Greenshot offer features such as integrated video capture and advanced editing capabilities. Understanding your specific requirements can help in selecting a more suitable option, enhancing your screen capture workflow.
Key Takeaways
- The snipping tool is essential for efficient screenshot management within Windows.
- Utilizing keyboard shortcuts can save time and enhance productivity.
- Effective editing and sharing techniques are vital for clear communication.
- Advanced features tailored for education and collaboration expand the tool’s utility.
- Exploring alternative tools may be beneficial for advanced screenshot functionalities.
FAQ
1. What are some common snipping tool options I can use?
Some common snipping tool options include Free-form Snip, Rectangular Snip, Window Snip, and Full-Screen Snip. Each option allows users to capture specific parts of their screen based on their needs. For instance, the rectangular option is ideal for capturing a designated rectangular area, while free-form allows for creative shapes, enhancing visual documentation of your work.
2. How to edit snips with the snipping tool?
You can easily edit snips by using the annotation features available in the snipping tool editing section. Once you capture an image, you can use tools to highlight, draw, and text add comments directly onto the screenshot. This editing capability enhances clarity and communication when sharing snips with others.
3. Can I use the snipping tool for video captures?
While the traditional snipping tool is limited to static images, software alternatives such as Snagit allow users to capture video clips. If you require video functionality, consider exploring these alternatives for more comprehensive screen recording capabilities.
4. What are the advantages of using the snipping tool?
The advantages of using the snipping tool include its ease of use, direct access within Windows, and simple screen capturing options without much technical know-how. It’s a powerful productivity tool, particularly effective for capturing quick visual notes or sharing important information.
5. How does the snipping tool compare to other screenshot software?
While the snipping tool provides basic screenshot functions, other software often includes enhanced features such as advanced editing, integrations with other apps, or cloud storage support. Consider your needs to determine if the basic features of the snipping tool are sufficient or if a more robust option is necessary for your tasks.
6. What is the preferred installation method for the snipping tool on Windows?
The snipping tool comes pre-installed on most Windows versions. However, for users wanting the latest features from newer versions, downloading it from the Microsoft Store or updating your Windows operating system may be necessary to ensure you are using the most reliable version of the snipping tool.
7. Are there any limitations to using the snipping tool?
While the snipping tool is very user-friendly, it lacks some advanced features present in dedicated screenshot software such as robust editing, extensive formatting options, and integrated cloud services. Additionally, users working in different operating systems may need to look for equivalent alternatives to use similar functionalities.